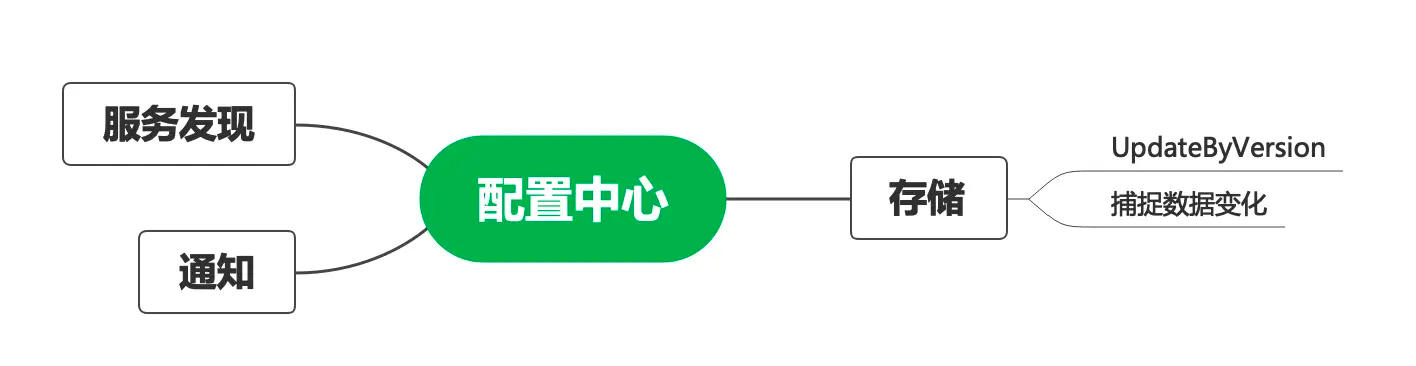
Raft主要使用了重叠的大多数技术来保证算法的安全
Raft首要追求的是可理解性
Raft使用数个技术来提升可理解性。包括
问题分解:主备选举、日志复制、安全性
尽量减少状态空间(相比Paxos,Raft减少了不确定性)
Raft新颖的特性 强leader 日志文件只单向传输,简化状态
leader选举 Raft使用随机定时器来选举leader。只添加了很小的机制,却能简单、快速解决冲突
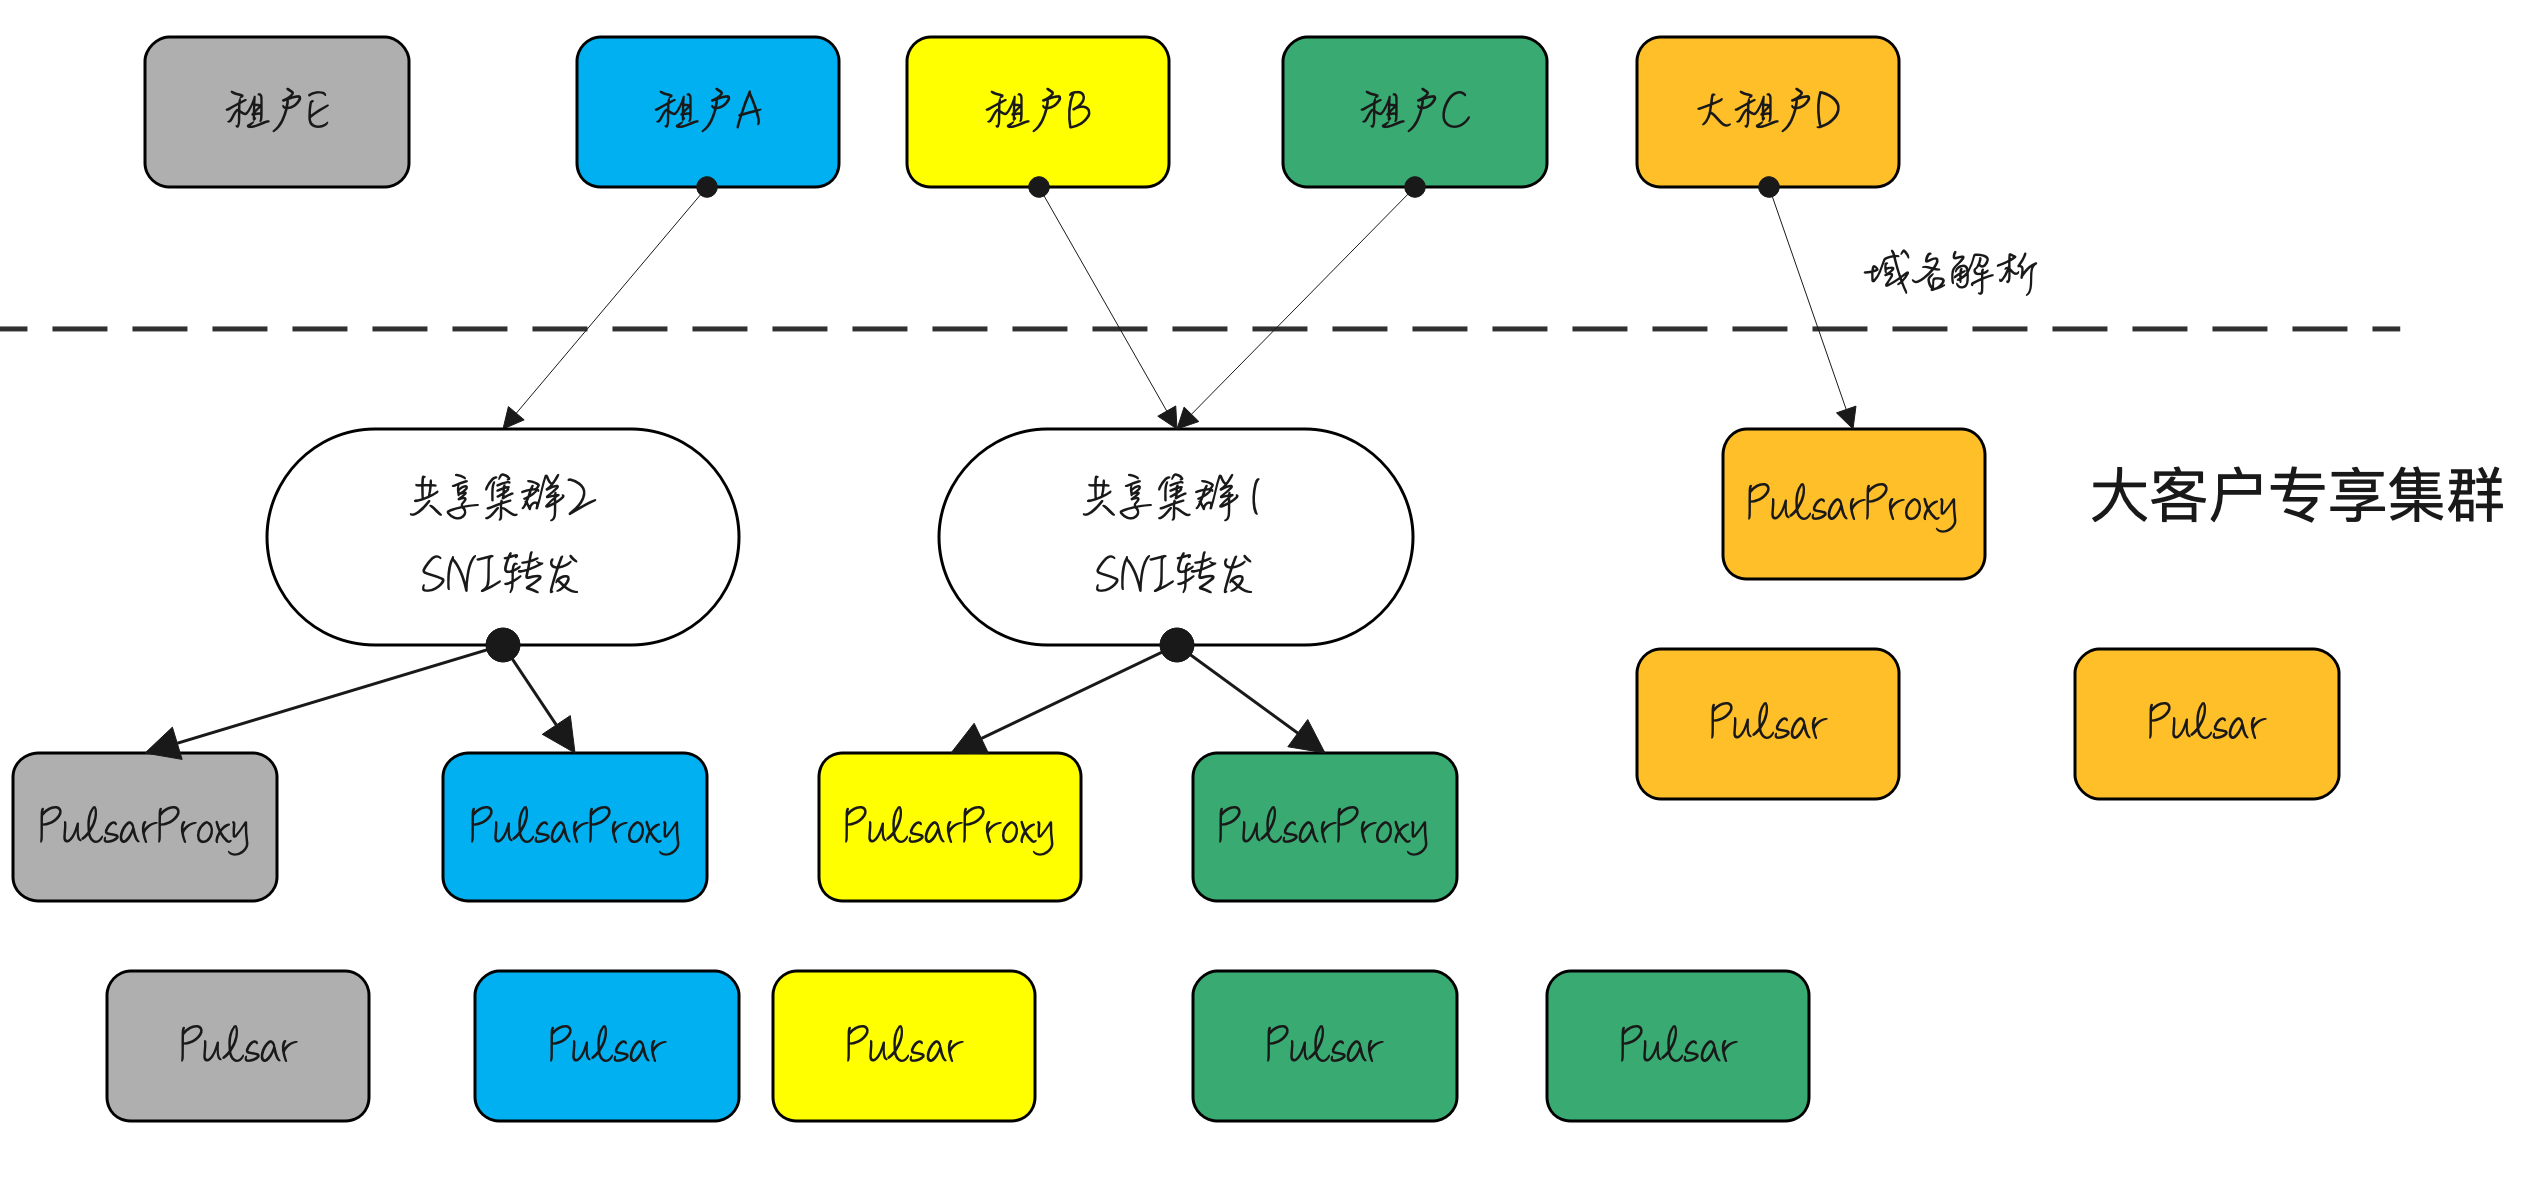
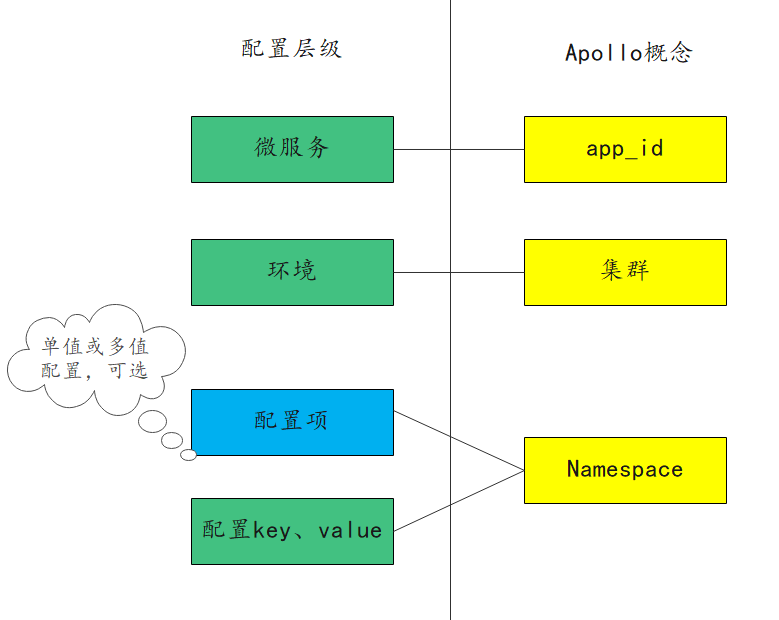
Membership变更 Raft的Membership变更机制使用joint consensus方法,在变更过程中,两个不同配置的大多数 重叠。这使得在集群成员变更时,也能正常处理请求
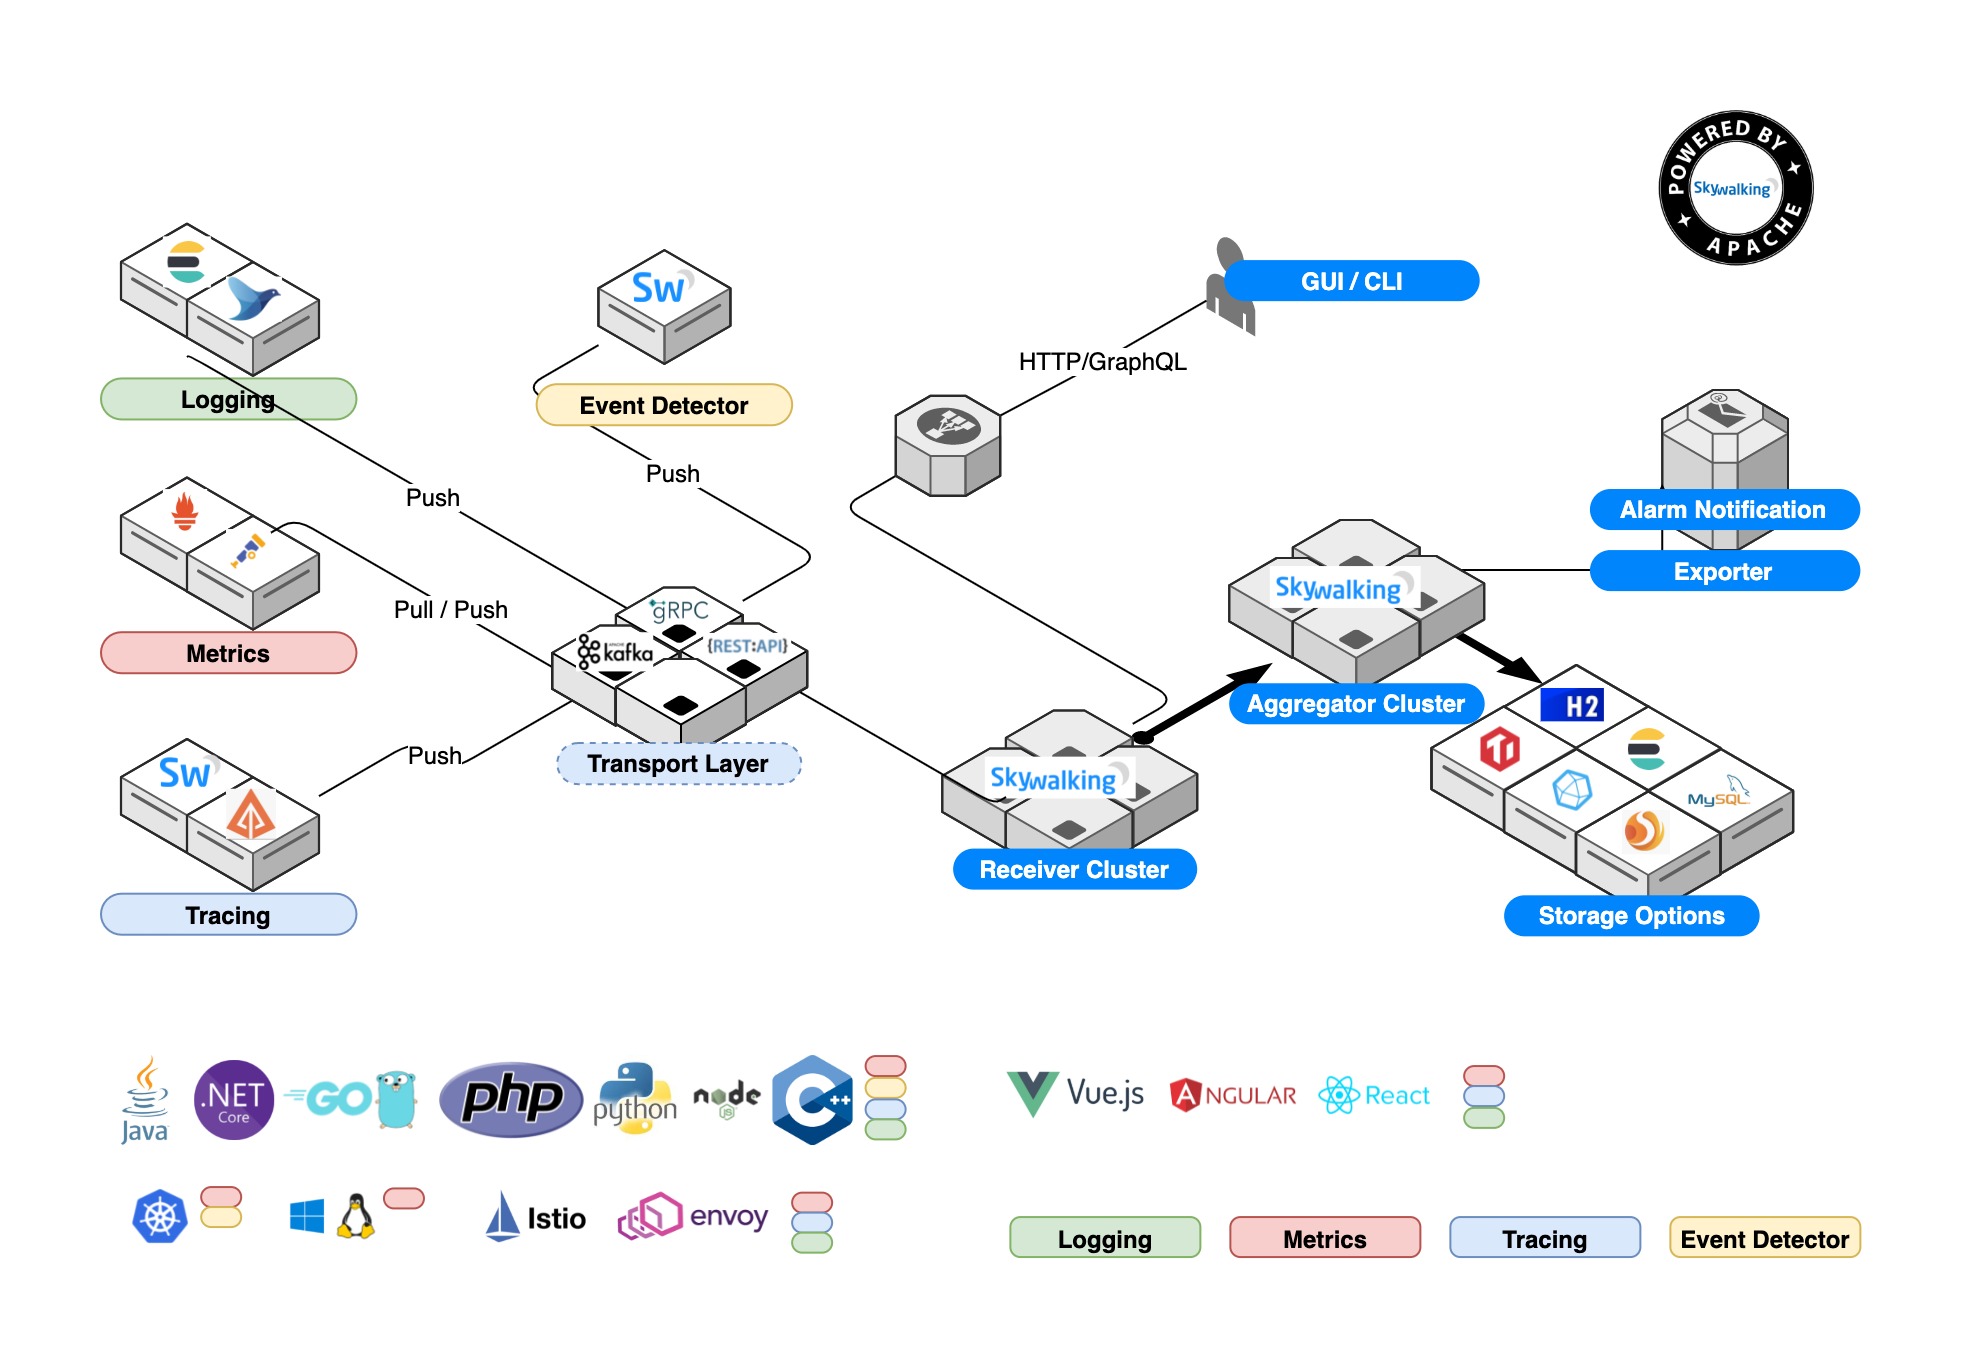
复制状态机 补图 保证复制状态机的一致,也就保证了数据的一致
一致性算法拥有如下的典型属性
在非拜占庭场景下,保证了正确性。包括 网络延迟、分区、丢包、乱序等
当大多数节点在线的时候,功能可用
不依赖时间来保证日志的一致性。错误的时钟和极大地消息延时,在最差的场景下,可能会导致一致性问题
在最常见的场景下,当一轮大多数节点反悔的时候,就能完成一个命令。小部分节点响应缓慢并不影响系统的整体性能。
Raft协议 简述 Leader选举 新的leader必须在已存在的leader宕机后选出
日志复制 leader必须从客户端哪里接收日志请求,复制到整个集群,迫使其他人达成一致
安全 Raft的安全属性关键。如果任何服务器将一个entry log复制到状态机中,那么其他任意服务器都不能在相同的log index上放置不同的命令。
安全的详细内容 Election Safety 选举安全 每一个任期内,至多只会有一个leader
Leader仅追加 leader不会覆写或者删除已存在的entry,只会追加新的entry(todo 待确认,是写入的,还是commit的,从leader可能是一个老的节点来说,这里应该说commit的更为恰当)
Log Matching 日志匹配 如果两个日志具有相同的任期值和相同的index,那么直到这个index之前的日志都是一样的
Leader Completeness Leader完整性 如果一个日志在一个给定任期内提交了,那么这个日志会一直存在,存在在任何高任期的Leader之中
State Machine Safety 状态机安全 如果服务器已在其状态机上将给定索引的日志条目应用于其状态机,则其他服务器将永远不会对同一索引应用不同的日志条目
Raft基础 Raft将时间切分成任期时长间隔的任期。Raft保证一个任期内至多只有一个Leader。任期可以称为是Raft中的逻辑时钟。每个服务器之间都会互相传播任期值。
Leader选举 Raft使用随机的选举时间来保证分裂投票场景少见并快速解决。将选举超时设定为一个范围。
Raft的作者们考虑过使用不同的Rank值,当分裂投票的时候,Rank值高的优先成为主节点,但在可用性方面有细微的问题。Rank值低的节点需要超时才能成为新的leader,这个时间间隔如果太短,会破坏已有的选举,集群太过敏感)
最终认为随机的措施更明显、更易懂
日志复制 Leader来决定何时将日志提交到状态机是安全的,叫做committed 提交。Raft保证提交过的entry都是持久化的,然后最终会被所有的状态机执行。
只有当前的Leader在任期内,然后将其复制到大多数节点,才算做committed!(这里有和仅仅复制到大多数节点有着重要的区别)然后这里会将之前的日志提交。
Leader每次发送AppendEntries RPC请求时,确认在这之前的日志和从节点完全相同。
Raft可以accept、replicate、应用新的日志记录。在正常场景下,经过一轮大多数RPC调用,就可以复制完成。
安全 假如,当leader提交数个日志的时候,follower不可用,然后他当选了leader之后,提交的日志把之前提交的日志覆盖了怎么办?
这里在选举当选leader的上面加了个限制,保证了之后的leader包含了之前所有已提交的entry。
选举限制 Raft使用投票阶段来防止一个没有之前提交过日志的候选者当选leader。候选者必须联络大多数节点才能当选,这就意味着提交过的entry一定在其中的一个服务器中。
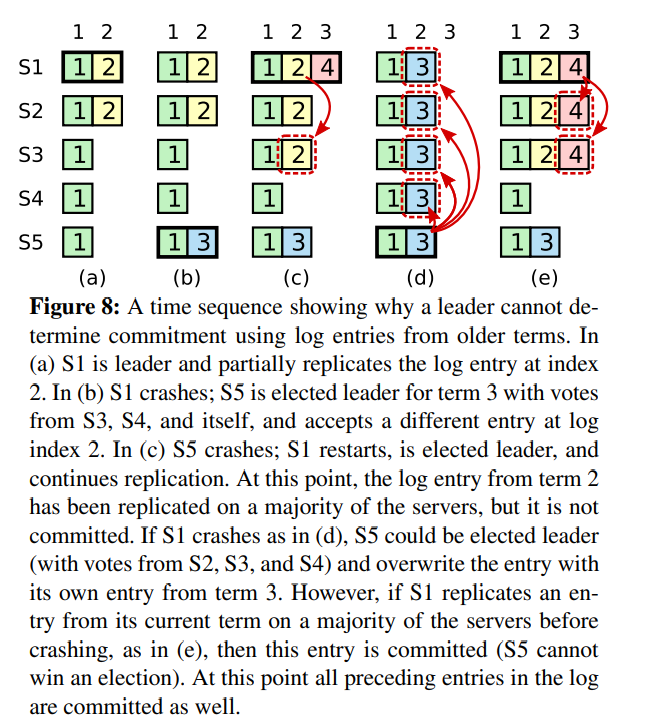
提交之前任期的entry leader不能立刻得出结论:之前任期的日志复制到大多数节点就已经算commit了。
a S1是leader,然后部分复制了日志2
b S1宕机,S5接受了S3和S4的投票当选了任期3的leader,在index2接受了不同的entry
c S5宕机,S1重启,当选了leader,继续复制
d S1宕机,S5重启,然后用任期3的日志覆盖了其他节点
e 然而如果S1在宕机前,把日志覆盖到大多数节点,那么S5就不能当选leader了
为了避免上图的问题,Raft绝不将复制的数量当作commit 日志的依据。只有当前任期下的entry log通过复制数量来计算。一旦当前任期的entry被提交,那么之前所有的entry都被间接commit了。
安全性保证 我们用反证法证明一旦Leader Completeness Property 没有满足,我们就会推断出一个矛盾。假设任期T的Leader提交了一个log entry在任期T,但是这个log entry没有被将来一些任期的Leader拥有。假设有一个没有包含这个entry的最小的任期U的Leader,Leader U没有存储这个entry
在选举的时候,提交的entry必须不在leader U的日志中(leader从不删除或复写日志)
Leader将这个entry复制到了集群中的大多数节点,并且leader U接收到了集群中大多数节点的投票。至少有一个服务器,即从leader T哪里接受了entry,并且给U投票。这是达成矛盾的关键
voter 必须在接收leaderT的entry之前给U投票。否则它就要拒绝T的写入请求
当voter给U投票的时候,它始终持久化着这个日志,因为每个中间的leader都包含这个entry,leader不会删除这个entry,除非冲突,follower也不会删除这个entry
voter给U投票,所以U的日志必须至少和voter的一样新,这就达成了第一个冲突
首先假设,如果voter和U都有同样的上一次log的任期,U的日志至少和vote一样。矛盾,因为最初假设U没有这个log,而voter有。
否则,leader U的上次log任期比voter的大。此外,它比T大,因为选民的上一个log term至少为T(其中包含来自T的提交entry)。 创建leaderU的最后一个log term的较早的领导者必须在其日志中包含已提交的条目(通过假设)。 然后,通过Log Matching Property ,leaderU的日志还必须包含已提交的条目,这是矛盾的
这就完成了矛盾的证明。比T任期大的leader一定包含了任期T内提交的entry
时间和可用性 Raft可以选举并维持一个稳定的leader,只要系统满足如下的时间限制条件
1 broadcastTime << electionTimeout << MTBF
broadcastTime是进行一个并行rpc到所有服务器来回的平均时间。MTBF是单个服务器故障的平均时间。
广播时间必须比选举时间小一个量级,所以leader放心的发送心跳消息,维护自己的follower。加上随机的选举时延,这个不等式也让选票分裂变得不可能。 如果广播时间和选举时间差不多,选举leader不稳定。
选举超时应该比MTBF小几个数量级,要不然选举的leader就不稳定。
集群成员变更 成员变更的时候,中途必须没有两个相同任期的leader。不幸的是,任何将服务器们直接从老配置变换到新配置都是不安全的。不可能一次性地原子性地把所有服务器的配置变更,所以中集群在中途可能会分裂为两个多数派。joint consensus。一旦joint consensus被提交,系统接下来过渡到新的配置。joint consensus结合了新老配置
Log entry在两种配置下都会复制。即新机器和老机器都会复制entry
不管是老配置还是新配置,都有可能当选leader
Agreement(协议,包括选举和entry提交)需要老配置和新配置多数派都确认
上述流程有三个问题RequestVote RPC,会导致当前的leader变为follower。新的leader最终会被选举,但是移除的服务器将会再次超时,重复整个过程,最终导致集群较差的可用性。RequestVote 请求。如果服务器在选举超时前接收到RequestVote RPC请求,它并不会更新它的任期或是给予它的投票。这并不影响正常的选举(每个服务器在选举之前等待最小超时时间)。并且,这有助于避免移除的server破坏选举:如果一个leader可以发送心跳到他负责的集群中的大多数节点,他将不会被更高任期的节点罢免。
成员变更过程中如果发生Failover,老Leader宕机, Cold,new中任意一个节点都可能成为新Leader,如果新 Cold,newLeader上没有 日志,则继续使用Cold ,Follower上如果有 Cold,new 日志会被新Leader截断,回退到 Cold,成员变更失败;如果新Leader上有 Cold,new日志,则继续将未完成的成员变更流程走完。
新成员先加入再同步数据,成员变更可以立即完成,并且因为只要大多数成员同意即可加入,甚至可以加入还不存在的成员,加入后再慢慢同步数据。但在数据同步完成之前新成员无法服务,但新成员的加入可能让多数派集合增大,而新成员暂时又无法服务,此时如果有成员发生Failover,很可能导致无法满足多数成员存活的条件,让服务不可用。因此新成员先加入再同步数据,简化了成员变更,但可能降低服务的可用性。
新成员先同步数据再加入,成员变更需要后台异步进行,先将新成员作为Learner角色加入,只能同步数据,不具有投票权,不会增加多数派集合,等数据同步完成后再让新成员正式加入,正式加入后可立即开始工作,不影响服务可用性。因此新成员先同步数据再加入,不影响服务的可用性,但成员变更流程复杂,并且因为要先给新成员同步数据,不能加入还不存在的成员。
日志压缩 每当有新的操作发生的时候,Raft的日志就会增长,然而在实际的系统中,日志并不能无边界地增长。
Leader创建snapshot,再分发给follower。有如下两个缺点Copy on write 技术,这样子在不影响snapshot写入的情况下,集群可以接受新的更新。
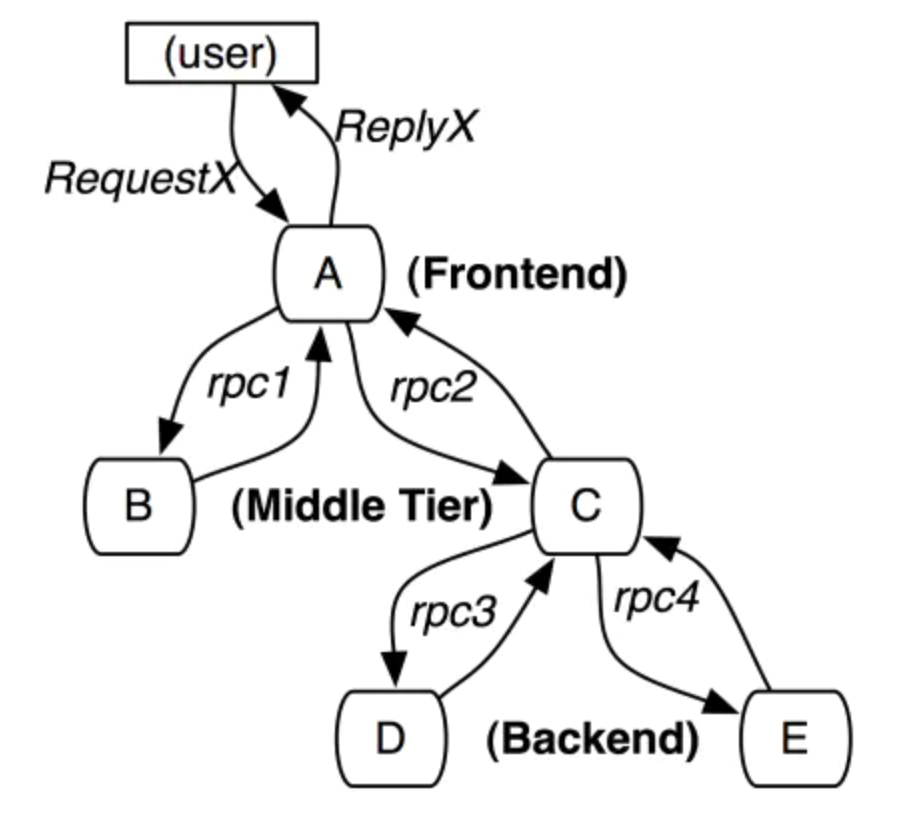
客户端的交互 Raft实现了线性化的语义。Linearizable semantics 。像es那样使用version,是达不到线性化的语义的。Leader Completeness Property 保证了leader有所有的committed entries,但是在任期的开头,可能并不知道那些entry已被提交。(为了确认,可以发空请求来commit数据)
性能 todo 补图
实现 InstallSnapshot RPC接口 由leader调用,发送snapshot的一部分到从节点。Leader总是按顺序发送chunk
参数
term leader的任期
leaderId 使得follower可重定向client的请求
lastIncludedIndex snapshot最后包含的index号
lastIncludedTerm snapshot最后包含的最后一个任期号
offset chunk在整个snapshot中的offset
data[] 原始数据
done 如果是last chunk则为true
返回体 term 当前任期,使得leader可以根据这个结果判断是否做操作
接收方的实现
如果接收到的任期小于当前任期,则立刻返回
如果接收到的chunk offset为0,则开始创建快照文件
在给定的offset处写入数据
如果done为false,返回且等待接下来的数据
保存snapshot文件,丢弃之前存在的所有快照文件
如果现有日志条目的索引和术语与快照的最后一个包含的条目相同,请保留其后的日志条目并回复
丢弃整个日志文件
把状态机重设为快照的内容(也使用快照内的集群信息)
State 状态 所有服务器上的持久化状态 在响应RPC之前更新到持久化存储上
当前任期 server见过的最大任期值(初始值是0,单调递增)
votedFor 在当前任期内获得投票的候选人ID(如果没有,则为null)
log[] log entry;每一个包含一个状态机的命令,包含从leader获取的任期(初始index为1)
所有服务器上的可变状态
commitIndex 已知要提交的最高日志条目的index(初始值是0,单调递增)
lastApplied 已知要应用到状态机上的最高index(初始值是0,单调递增)
leader上的可变状态 选举后重新初始化
nextIndex[] 对每个服务器,将要送给另一个服务器的下一个log entry的index(初始化为leader的lastLogIndex+1)
matchIndex[] 对每个服务器,知道的复制到该服务器的最大的log entry的索引。(初始化为0,单调递增)
AppendEntryies RPC 被leader触发,用来复制log entry;也用于心跳。
参数
term leader的任期
leaderId 使得follower可重定向client的请求
prevLogIndex 紧接新记录之前的日志条目索引
prevLogTerm 紧接新记录之前的日志条目索引的任期
entries[] 要存储的entries。心跳时为空,批量来提升性能
leaderCommit leader的commit index提交索引
返回结果
term 当前任期,使得leader可以根据这个结果判断是否做操作
success 如果follower包含了匹配的prevLogIndex和prevLogTerm,就返回true
接收方实现
如果term < current term,返回false
如果不包含匹配的prevLogIndex和prevLogTerm,就返回false
如果有一个存在的entry和新的冲突(相同的index,不同的term),删除哪个entry和在其之后的所有entry
添加没在log里面的所有entry
如果leaderCommit > commitIndex, 设置commitIndex为leaderCommit、lastNewEntry的最小值
RequestVote RPC 由candidate调用来收集选票
参数
term 候选者的任期
candidateId 候选者的请求投票
lastLogIndex 候选者的最后log entry的索引
lastLogTerm 候选者的最后log entry的任期
返回结果
term 任期,可以让candidate根据任期做操作
voteGranted true代表候选者收到了选票
接收方实现
如果term < currentTerm返回false
如果votedFor或candidateId是null,并且候选者日志至少比接受者的新,给予自己的投票
Server遵守的规则 Rules for Servers 所有服务器
如果commitIndex > lastApplied: 增加lastApplied,把log[lastAplied]应用到状态机上
如果rpc请求或响应中,包含的任期T比当前的Term值大,则将当前的任期值设置为T,转换自己为follower
Follower
向候选者和leader响应rpc
在选举超时的时间间隔内,没有接收到AppendEntries RPC请求或者投票给其他人,那么切换为候选者
候选者
一旦转化为候选者,开始选举
增加任期号
给自己投票
重置选举定时器
向其他服务器发送RequestVote RPC请求
如果接收到了大部分节点的投票,成为leader
如果AppendEntries RPC从新的leader处返回,变为follower
如果选举超时,启动新的选举流程
Leader
选举完成后:发送空的AppendEntries RPC请求到每个服务器(心跳),在空闲期间重复此操作避免选举超时
从客户端哪里接收到命令;添加entry到本地的日志中,待把这个entry复制到状态机后响应
如果对一个follower有,last log index >= nextIndex,从nextIndex开始发送AppendEntries RPC请求
如果成功:更新follower的nextIndex和matchIndex
如果因为日志不一致的原因失败:降低nextIndex然后重试
如果存在N,且N>commitIndex,大多数节点的matchIndex[i]>=N,并且log[N].term == cuurentTerm,设置commitIndex=N