对于maven项目来说,模块的划分和pom(Project)文件可谓是至关重要,但往往在商业代码中,maven模块和pom文件并不得到大家的重视,最终导致模块杂乱、pom文件复杂难度,进而导致团队维护成本高。随意地exclude,随意地指定版本号,只会将项目带入依赖管理的地狱。本文讲述maven项目模块布局以及pom文件书写原则。
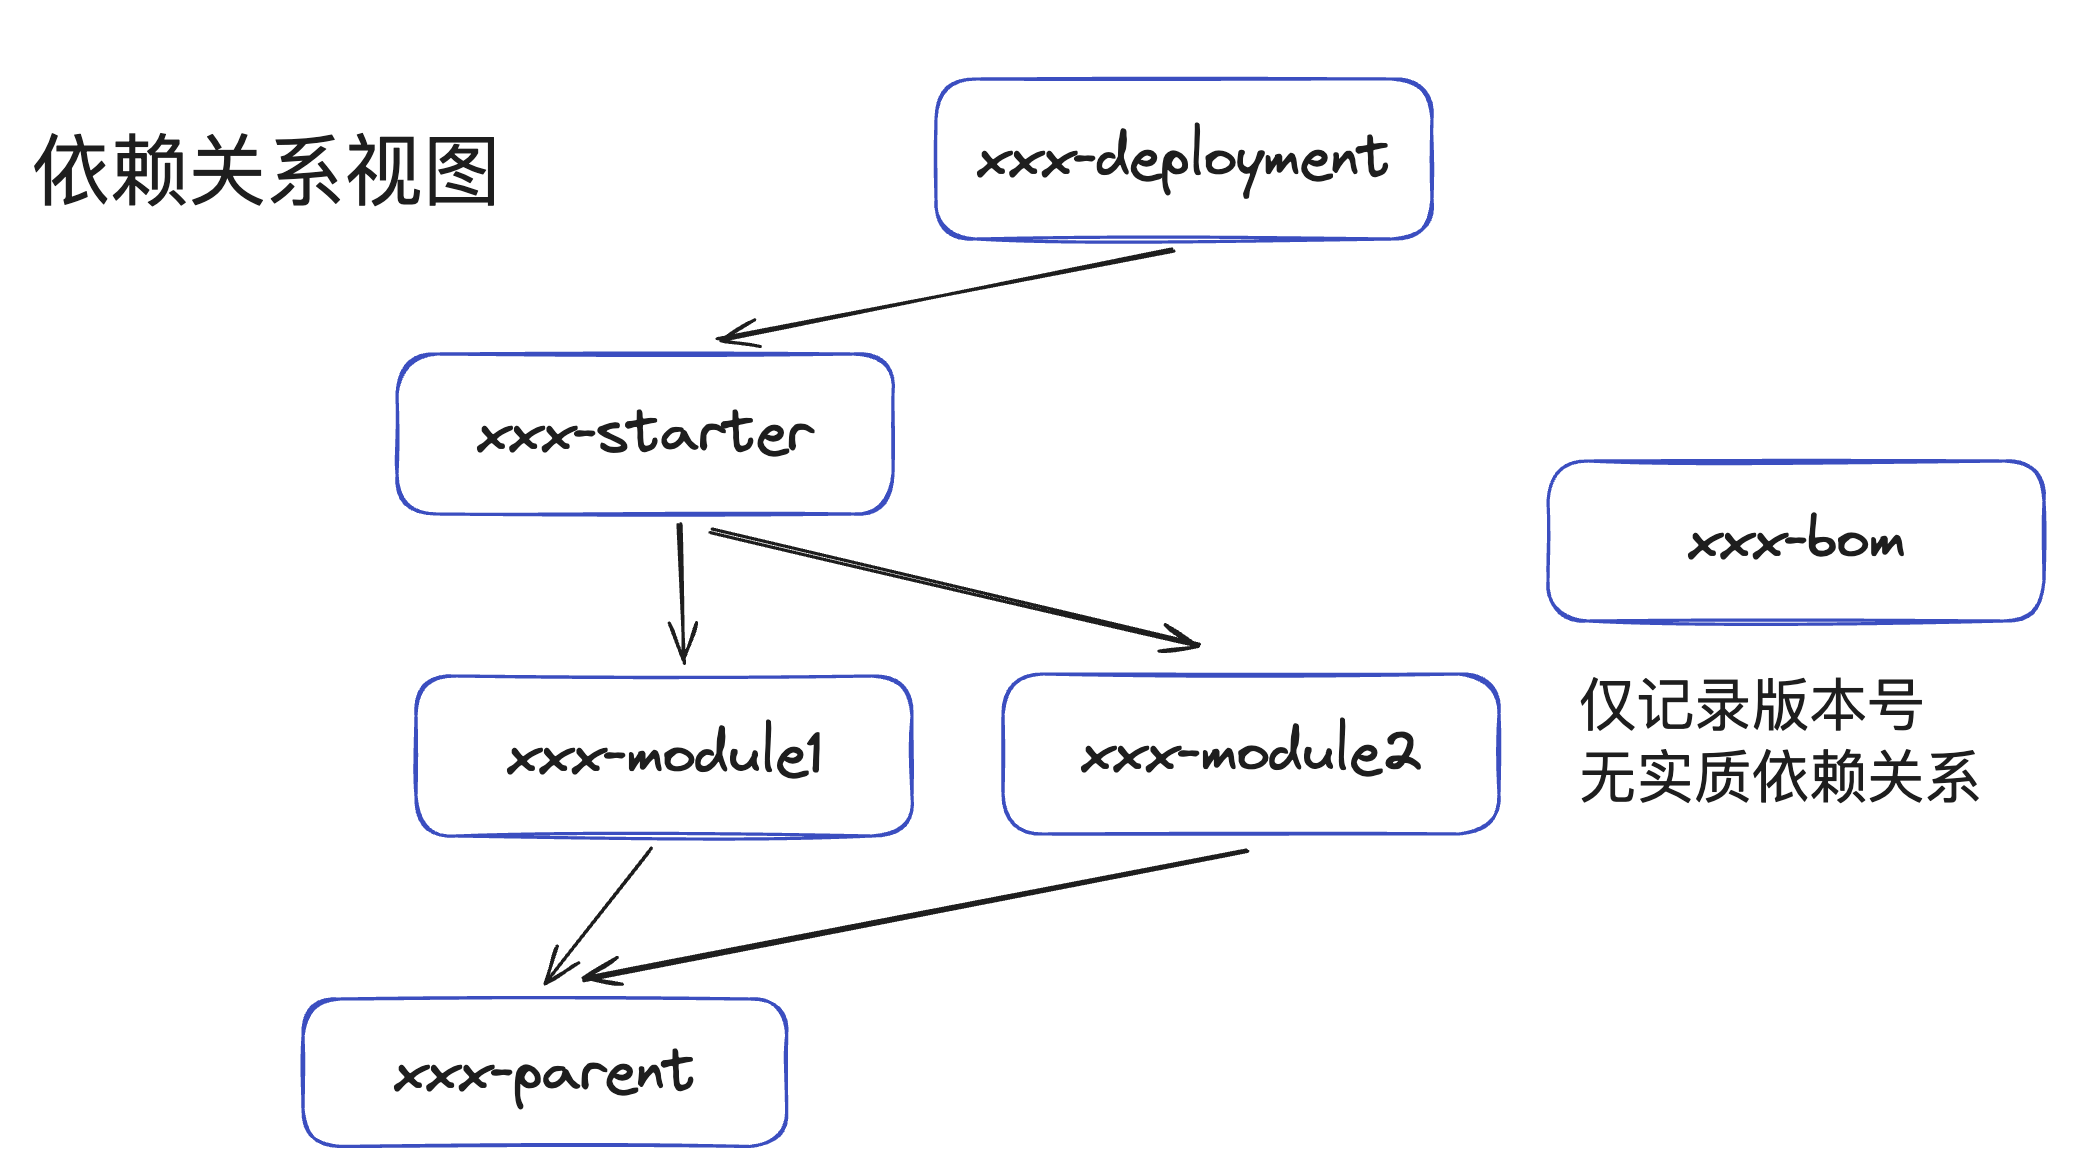
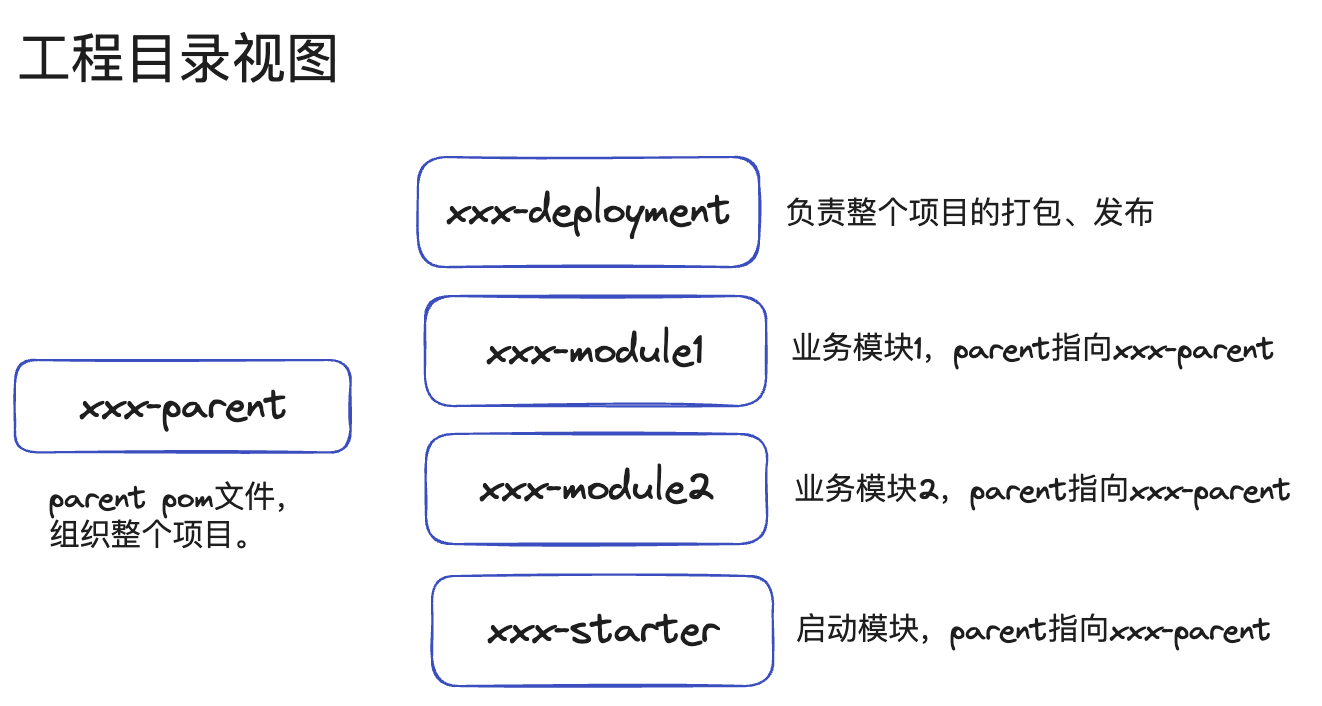
maven项目模块布局 常见的一个需要打包发布、发布到maven仓库、并提供本项目bom的maven模块划分,以项目名xxx为例,当然,实际的项目可能会更加复杂,拥有common、util模块等。
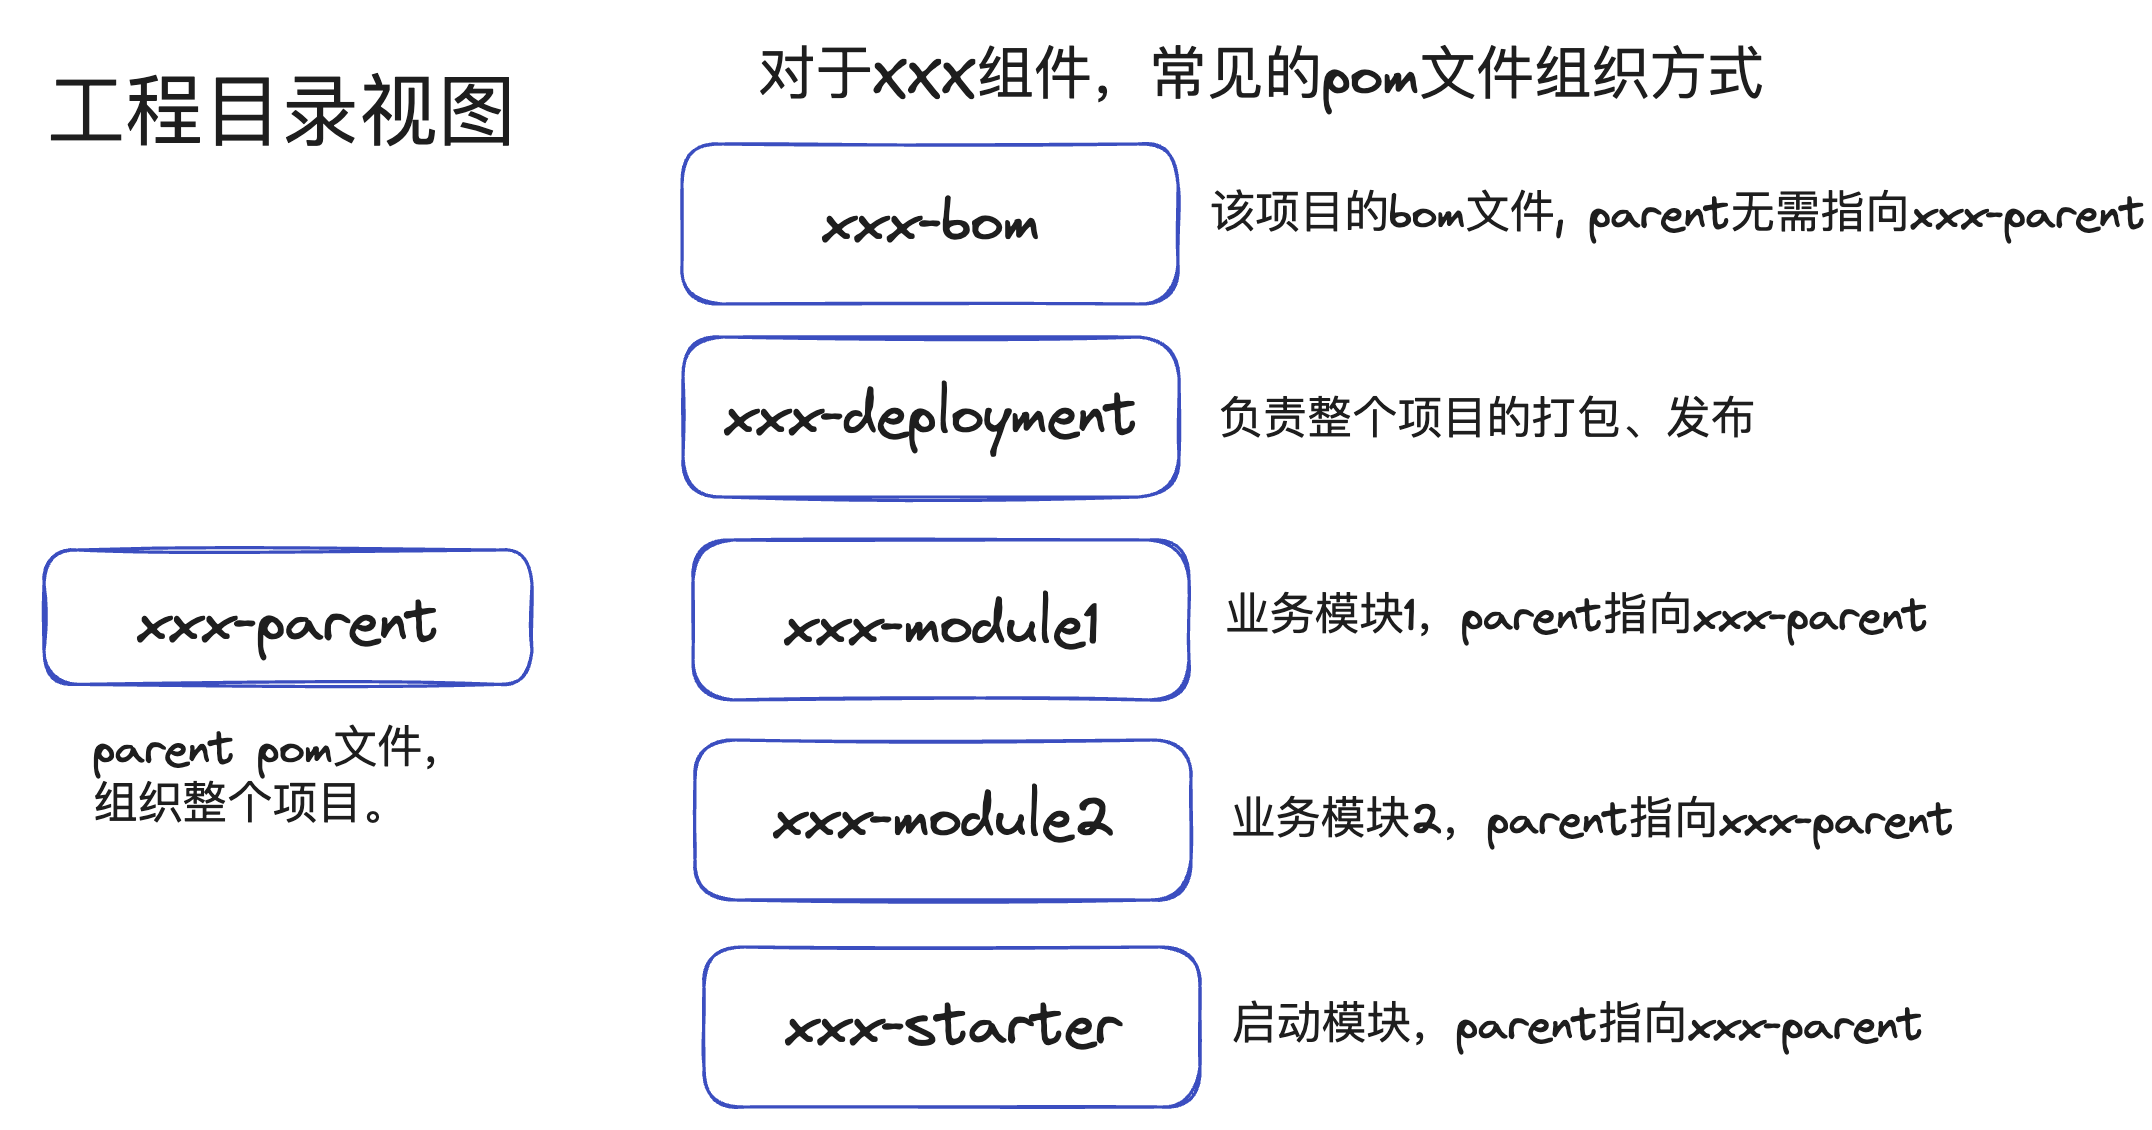
工程目录视图
依赖关系视图
xxx-parent用来组织整个工程,常见的可以放一些诸如java版本、checkstyle、spotbugs等配置,xxx-parent也可以考虑以上层依赖/组织发布的parent作为parentxxx-parent会有很多的依赖、插件配置,xxx-bom仅给其他项目提供版本号,没必要引入过多的依赖。
很多商业微服务,根本不涉及会将代码的一部分发布成library给其他人使用,那么可以进行简化,将bom去除
依赖管理原则 选择合理的maven parent java基于jar包而不是源码的依赖方式是jar包版本冲突罪恶的源头,像Netty这样基于4.1,一直维护了100多个小版本的library何其之少。这导致了java应用程序依赖的jar包,需要一个微妙的关系才能搭配运行,比如springboot3.x才能对应hibernate 6.x版本等。对于一个springboot项目,我们没有必要也没有意义去定义hibernate的版本号,只需要将Spring的依赖指定为parent就可以了。
对于企业内部团队,可以选择由企业公共团队维护的maven parent,或者内部基于合适的parent构筑公共maven parent(如果有)
对于SpringBoot项目,可以使用SpringBoot维护的公共parent
对于Apache组织下的项目,常见使用Apache维护的父pom文件
依赖版本统一管理 对于大部分项目来说,子模块使用的依赖版本号都是一致的。尽量将版本号都通过parent或通过<properties> 统一管理引用起来,比如
1 2 3 4 5 6 7 8 9 10 11 12 13 14 15 16 <properties > <pulsar.version > 2.10.0</pulsar.version > </properties > <dependencies > <dependency > <groupId > org.apache.pulsar</groupId > <artifactId > pulsar-client-api</artifactId > <version > ${pulsar.version}</version > </dependency > <dependency > <groupId > org.apache.pulsar</groupId > <artifactId > pulsar-client-original</artifactId > <version > ${pulsar.version}</version > </dependency > </dependencies >
不要使用多个大项目的dependency management 对于一些bom文件较为简单的项目,比如netty、jackson等,引入没有问题。但引入多个大项目的dependency management,比如同时引入公司内的parent、springboot某个dependency parent、再比如同时引入两个springboot衍生项目作为dependency management,可能会导致依赖版本传递关系复杂,难以维护。
合理选择依赖的scope 举个例子:
对于library依赖,不应该把log4j2作为自己的compile级别依赖,只能作为runtime和test级别的依赖。
避免使用大量的exclude、指定版本号 大部分情况下,无需进行exclue、特殊指定某个组件的版本号,仅当版本冲突,或紧急漏洞修复。每一个exclude、指定版本号都应该有合理的原因。尽量不在某一个子模块里单独exclude、指定版本号。合理的exclude如
1 2 3 4 5 6 7 8 9 10 11 <dependency > <groupId > org.springframework.boot</groupId > <artifactId > spring-boot-starter-web</artifactId > <exclusions > <exclusion > <groupId > org.springframework.boot</groupId > <artifactId > spring-boot-starter-logging</artifactId > </exclusion > </exclusions > </dependency >
pom文件书写核心注意点 pom文件就和代码一样,优美的pom应该整洁、避免重复、在项目中拥有统一的风格。
有序地组织pom文件 某个节点下有大量的元素时,优先按照含义区分先后顺序,比如compile依赖在先,test依赖在后;比如按依赖顺序pulsar-api在先,pulsar-client在后,其次可以按照字母顺序排列。会大大提升整个pom文件的可读性。
依赖管理,可以按照compile、runtime、test,并按照依赖的重要程序排序。比如在opengemini-client-reactor中,将本项目的模块放在上面,三方依赖放在下面
1 2 3 4 5 6 7 8 9 10 11 12 <dependencies > <dependency > <groupId > io.opengemini</groupId > <artifactId > opengemini-client-api</artifactId > <version > ${project.version}</version > </dependency > <dependency > <groupId > io.projectreactor.netty</groupId > <artifactId > reactor-netty-http</artifactId > <version > ${reactor-netty.version}</version > </dependency > </dependencies >
properties里面,可以按全局、依赖、插件分别归类,并在小类中按字母名称排序。示例如下:
1 2 3 4 5 6 7 8 9 10 11 12 13 14 15 16 17 18 19 20 21 22 23 24 25 26 27 28 29 30 <properties > <maven.compiler.source > 8</maven.compiler.source > <maven.compiler.target > 8</maven.compiler.target > <project.build.sourceEncoding > UTF-8</project.build.sourceEncoding > <src.dir > src/main/java</src.dir > <async-http-client.version > 3.0.0.Beta3</async-http-client.version > <junit.version > 5.10.0</junit.version > <lombok.version > 1.18.30</lombok.version > <log4j.version > 2.20.0</log4j.version > <okhttp.version > 4.12.0</okhttp.version > <jackson.version > 2.13.4.1</jackson.version > <puppycrawl.version > 10.12.3</puppycrawl.version > <reactor-netty.version > 1.1.10</reactor-netty.version > <slf4j.version > 2.0.7</slf4j.version > <lombok-maven-plugin.version > 1.18.20.0</lombok-maven-plugin.version > <maven-compiler-plugin.version > 3.11.0</maven-compiler-plugin.version > <maven-checkstyle-plugin.version > 3.3.1</maven-checkstyle-plugin.version > <maven-enforcer-plugin.version > 3.4.1</maven-enforcer-plugin.version > <maven-enforce-plugin-maven.version > 3.8.0</maven-enforce-plugin-maven.version > <maven-gpg-plugin.version > 3.1.0</maven-gpg-plugin.version > <maven-javadoc-plugin.version > 3.6.0</maven-javadoc-plugin.version > <maven-release-plugin.version > 3.0.1</maven-release-plugin.version > <maven-release-plugin-scm-provider-gitexe.version > 2.0.1</maven-release-plugin-scm-provider-gitexe.version > <maven-source-plugin.version > 3.3.0</maven-source-plugin.version > <maven-surefire-plugin.version > 3.2.1</maven-surefire-plugin.version > <nexus-staging-plugin.version > 1.6.13</nexus-staging-plugin.version > <spotbugs-maven-plugin.version > 4.7.3.6</spotbugs-maven-plugin.version > </properties >
对maven revision的看法 maven从3.5.0版本开始,支持revision。允许其他模块引用父pom里面的版本号。IDEA对这个特性的支持还不是特别好,比如父pom里面定义
1 2 3 4 5 6 7 <groupId > com.shoothzj</groupId > <artifactId > parent</artifactId > <version > ${revision}</version > <properties > <revision > 6.0.0</revision > </properties >
主要的好处有两条:
使得版本号修改只需要修改父pom一个文件,不需要大量修改多个文件。
可以通过ci覆盖版本号,无需代码修改,就能发布。
如果您的项目不涉及这两条,那么大可不必使用这个特性